
What a Source is
A Source is the original evidence Cromo reads: a policy, procedure, spreadsheet, presentation, note, image, or synchronized file. Cromo preserves the Source while turning useful information into facts and Knowledge pages. Use Sources for stable reference material. Put changing operational records—such as open renewals, tickets, or invoices—in Data.Before you begin
You need the Member, Admin, or Owner role and membership in the target Project. Prepare the file before uploading it:- keep the title, owner, and effective date visible;
- remove obsolete drafts from the upload;
- split unrelated policies into separate files;
- check that scans, tables, and images are readable;
- remove content that belongs to another Project.
Add a Source
1. Open Sources
- Open the Project that should use the material.
- In the sidebar, open Knowledge.
- Select Sources.
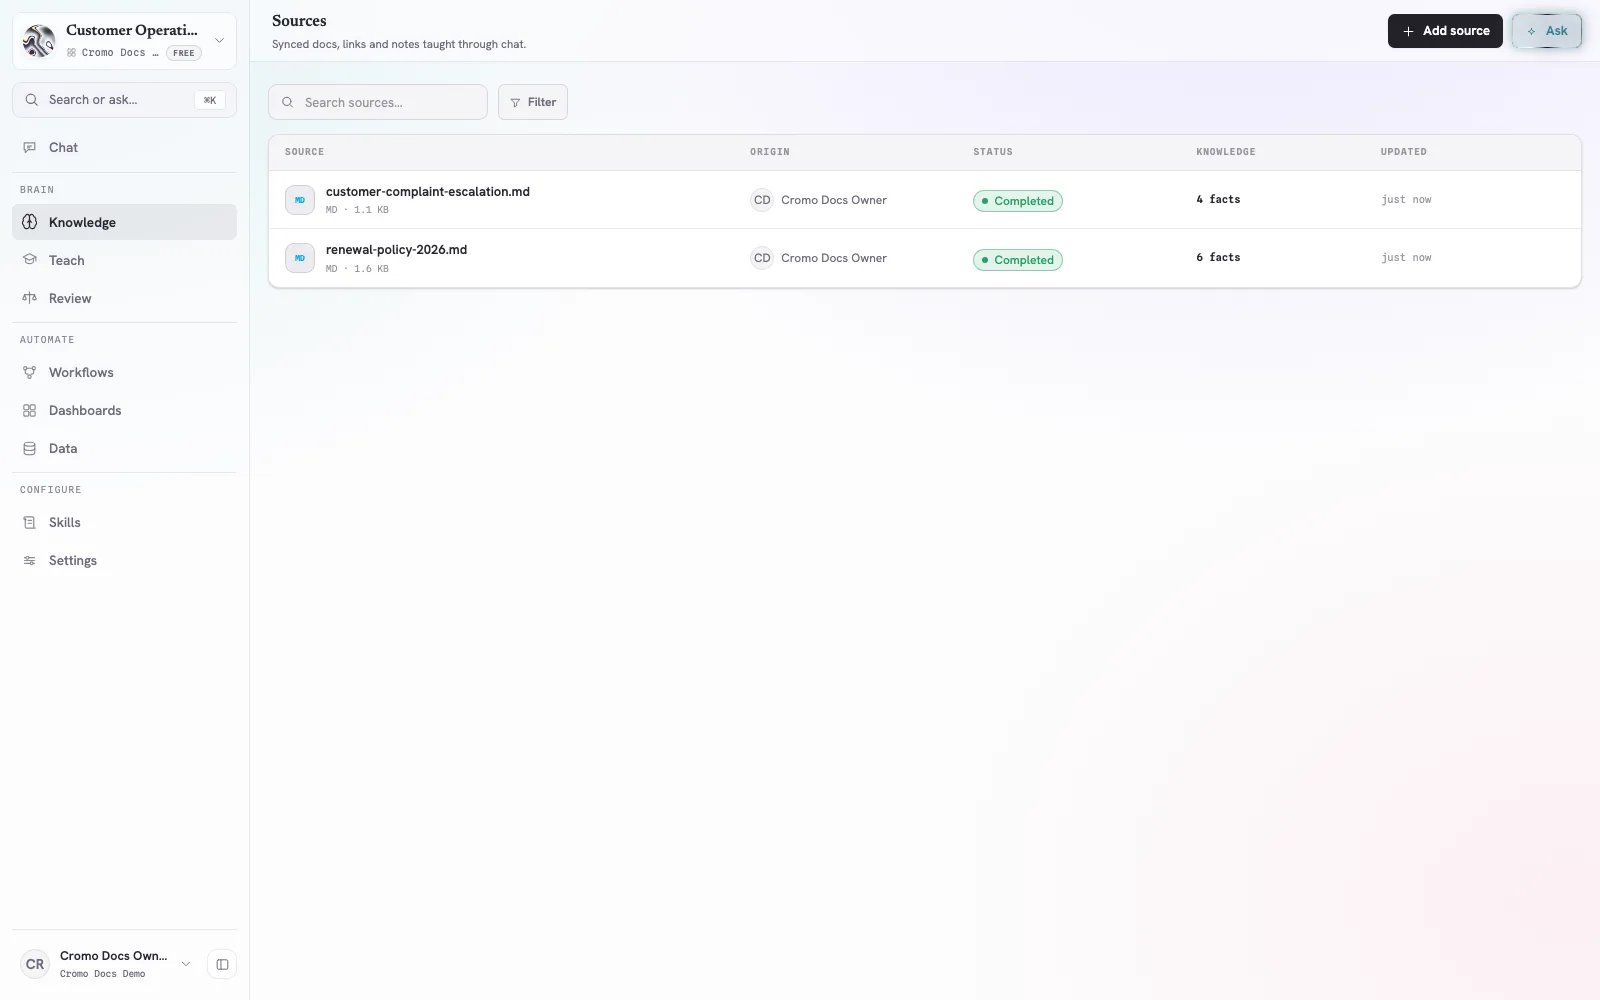
The Sources list shows processing status and how many facts each file contributed to Knowledge.
2. Upload the file
Choose either method:- select Add source, then choose one or more files;
- drag files from your computer onto the Sources page.
Follow processing
The status column tells you what requires attention:
The fact count in the Knowledge column shows how many approved facts from that Source are available to the Project.
Inspect a Source
Select a row to open its detail panel. Use it to:- confirm the file name, type, size, and upload time;
- follow the journey from upload through conversion and compilation;
- preview the converted Source;
- open Knowledge pages created from the Source;
- open a pending candidate when a review decision is required.
What to verify
For a policy or procedure, check:- dates and monetary thresholds;
- owners and approvers;
- required evidence;
- exceptions and escalation paths;
- whether each fact belongs in this Project.
Review Knowledge when required
When a Source shows Needs review:- Open Knowledge → Review.
- Select the proposed page or update.
- Compare each important statement with its Source references.
- Approve correct content or reject unsupported content.
- Return to Sources and confirm the Source reaches Completed.
Example: add a renewal policy
Suppose the file says:- enterprise renewals above €100,000 start review 90 days before expiry;
- the Account Owner prepares the commercial proposal;
- Customer Success supplies a risk note;
- Legal reviews non-standard liability terms.
- Upload the current policy to Knowledge → Sources.
- Wait for Completed or resolve any Needs review item.
- Confirm that the Source contributed facts to Knowledge.
- Open the resulting renewal page and check the threshold, timing, owners, and exception.
- Ask Chat:
For a €150,000 enterprise renewal with non-standard liability terms, when does review start, who contributes each document, and who must approve the exception? Cite the renewal policy.
- Open the citations and compare the answer with the original Source.
Replace an outdated Source
Do not overwrite history mentally by adding an unlabeled replacement.- Prepare the new file with a visible effective date.
- Upload it as a new Source.
- Check the proposed Knowledge changes and conflicts.
- Verify the resulting page and a cited chat question.
- Delete the old Source only after the new Source supports every rule the team still needs.
renewal-policy-2025-06.pdfrenewal-policy-2026-01.pdf
Delete a Source
- Select the Source row.
- In the detail panel, select the trash icon.
- Read the impact warning.
- Confirm Delete only when the Source and its derived Knowledge are no longer needed.
Troubleshooting
The Source stays queued or updating
Open its detail panel and check the latest journey event. If processing reports a failure, correct the file and upload a new copy.The fact count is zero
Preview the converted Source and confirm it contains readable, useful statements. A blank scan, image-only document, or file with no durable Project knowledge may not produce facts.The wrong Project received the file
Delete it from that Project, then upload it to the correct one. Project Sources and Knowledge are isolated by Project membership.Chat does not use the new rule
Confirm that processing is complete, resolve any pending review, then ask with the relevant Knowledge page or Source attached. Include the exact outcome, scope, and rule you need.Source quality checklist
- The Source is current and authoritative.
- Its title, owner, and effective date are clear.
- It belongs in this Project.
- Processing reached Completed.
- Important facts and pages were inspected.
- Dates, thresholds, owners, and exceptions are accurate.
- A cited chat question returns the expected answer.